Bathroom reno inspiration!


It’s official = 2013 is the year of the major bathroom renovation!

Here’s to having a proper sized bathtub, not hitting our elbows on the wall every time we shower, being able to brush our teeth at the sink together (at the same time…what a concept) and not having the top of our toilet tank overlapping with our sink (true story)!  Before, during and after photos will come as the weeks pass – we plan on starting this overhaul in mid-February.  Until then, and as we begin shopping for all of the elements that go into a bathroom reno, I thought I’d share with you our ideas and inspiration for the design and aesthetic of the soon-to-be-finished product.

Our goals:

  • make use of the existing window inside the bathroom and allow natural light in
  • create a ‘spa’ feeling
  • create enough room so that we can both be in the bathroom at the same time

I’ve been adding to our Pinterest board for…about the past 6 months (what can I say? I was excited!) and it’s been neat to watch the progression of our vision.  First, ‘spa’ meant more grey tones: stone tiles, and neutrals.  But as the months progressed, our images started to move towards lighter, clean and crisp tones with pops of ice blue or seafoam green.  I suppose spending a week on the west coast over the holidays, including a trip down to Cannon Beach, helped us to channel “sea shore” inspiration into our plan!

Cannon Beach

So, with beach inspiration fresh in our brains, it was back to the Pinterest drawing board!  Here’s where we are at, and as we finalize our tile choices in the coming weeks, we are feeling great about our percolated vision (yep, it’s like coffee…you just have to let it brew, and it will come):

Bathroom inspiration

The main bathroom images above come from here, here, here and here…let’s highlight the one the really started it all, and really got us thinking about the beauty that is blue and white:

Blue Bathroom

I love the simplicity of this bathroom (from Houzz.com).  Plus, the fact that is the very same layout that we are moving towards, complete with an in-shower window, the look just clicked.  So, our path is set and this shopping has begun!  New bathroom coming very soon…

Draining our resources

From my recent update a few days ago, I shared a very important lesson learned:

concrete + pipes = BAD

Our house seems to have a love-hate relationship with water.  The majority of things that have gone wrong in this house relate to water, so I suppose it’s become some sort of sick joke.  From the major roof leaks in our guest bedroom and office, to a burst pipe leaving water pouring out of the ceiling in our basement laundry room, to a backed up clean-out that had to be replaced in late 2009…with our latest little endeavour, I’d have to estimate that we have spent close to $5,000 in water-related “incidents”.  Oh, the joys of home ownership.

So, to summarize our recent adventure, here’s what happened: as Christian and I tackled the latest of our reno projects (most recently, the front porch reno), Christian was busy mixing mortar for our tiles, and, although dating farther back but still having impact on this story, Christian had also been doing some concrete work on our back steps. 

Well, with our built-in-the-1930s 3-inch diameter pipes that twisted and turned under the floor of the basement apartment, concrete and mortar “bits” don’t fare too well when it comes to those small nooks and crannies.  What had happened over the past year or so, is that bits of concrete and mortar had gone down the drain and had found a new home in which to expand = our pipes.

What ensued was that every time it would rain, the water would come down the steps towards the basement door, and instead of going down the trench drain that Christian had put in, or even down the drain in the downstairs laundry room, it basically pooled and overflowed. 

So we called our friend Neil at Drainforce (they don’t have a site, but we’ve used them twice and they’ve been fair and reliable so wanted to provide a number for y’all) to come on down.  The conrete in our pipes was so bad, that he couldn’t even get his scope through to “scope out” the situation (get my joke?  Scope out? Yep, barrel o’ laughs over here…)

Neil and his team were great, although Christian and I were super depressed to learn that the problem extended through our newly finished floor.  All in all, the team had to break up about 30 square feet of concrete and tile, replace the pipe, and re-pour the concrete.  Here’s a “drying-stage” photo….I love the added drama of the CAUTION tape:

And here’s another angle of the damage – you can see the big trench drain I was talking about.  Please, try not to focus on the ugly conrete steps…there on the “down the road” list, we promise:

While Christian typically chooses to do this type of work himself, time was of the essence, and it turned out we fixed this in the nick of time, as Toronto and surrounding areas were hit was a serious storm on Sunday.  This was the ultimate test.  Christian and I were actually in the downstairs laundry room when the heavens opened and Noah’s flood came down the stairs…well, our $$$ were well spent – not a drop flowed onto the floor!  Everything went down the shiny, new, non-concrete filled pipe!  VICTORY!  Thanks Neil!!!

The hardest part for us was trying to match the floor tile.  Seriously, has anyone tried to do this before?  Impossible.  We were lucky enough to find about 9 tiles leftover in the garage that the previous home-owners had left us, but we needed about 29.  So off to Lowe’s and Rona we went, sample tile in tow.

I wish I had a picture of this, but it was such a work-night rush to get what we needed that I forgot the camera.  I was litterally on all fours in the middle of the aisle, comparing and contrasting 6 different tiles.  Good rule of thumb that I learned: go for the overall colour tones of the tile and try not to get too caught up with the pattern.  When it comes to grout, go darker than you think, espeically when replacing new tiles within an old floor – the older grout will always look less clean (it took me two trips to Home Depot to figure that one out).

And thus concludes our water-logged drama….and the basement has returned to normal (mis-matched yet barely noticeable tiles and all):

I sincerely hope that we are done with water drama for the next several years….and you know what, Madonna, I do not want to sing about rain right now, or think about any more water in or around our house.  At all.  Thank you, and good night.

Good rule of thumb: Pipes + Concrete Don’t Mix

Sorry I’ve been a bit MIA for several days – there’s a good story behind it, I promise!  It seems that we’re having a little bit of…er….water drama. Christian and I have managed to avoid major house melt-down for some time since our initial massive overhaul way back in the fall /winter of 2009 (we don’t miss those repeat moments of leaking ceilings in multiple rooms, flooding basements and so on).

Well, our lucky streak is over and we have learned a good lesson: concrete + pipes = BAD.

To keep it short and sweet for now: do not, I repeat, DO NOT rinse anything that has mortar or concrete in your laundry sink.  Even if you think “hey, this is just a little bit at the bottom of the pail…no bigge”.  It’s a biggie.  Don’t do it!!!!

More to come on this, (with some photos, of course), but let’s just say there is some serious upheaval happening in the basement and we are not happy campers.

Water has continued to be our #1 enemy when it comes to our happy little home. All will be fine in a few days, we’re certain, and I’ll be sure to fill you in on all the dramatic details soon!

Stay dry!


To enclose, or not to enclose: PART 2, the Grand Finale!

For those of you who had the chance to read my recent blog on our flip-flopping decision relating to our porch enclosure, you will be pleased to know that it’s time for the grand reveal.  There are, of course, several tweaks, finishing touches and final projects to be completed (it’s the renovation that keeps on giving, remember?), but you will get the overall gist of our latest renovation experience momentarily.


Before I get to the grand reveal, let’s review the stages of progress, shall we?  As I’ve already shared with you, Christian and I would consider ourselves to be renovation vets, having already tackled a complete basement overhaul, re-wiring of our old knob-and-tube electrical (NOTE: we didn’t do the wiring, but cleaned up the massive mess afterward by patching and painting all the walls!), giving our kitchen a serious facelift, removing walls on the main floor, installing flooring and refinishing our stairs (oh, the blog stories to come!).  Now, Christian and I decided to work on the porch enclosure and front-of-house over our main upstairs bathroom for two key reasons:

1) it would be faster, and,

2) it would be cheaper.


Turns out, we were pretty much wrong on both fronts.


Weekend #1: May Long Weekend

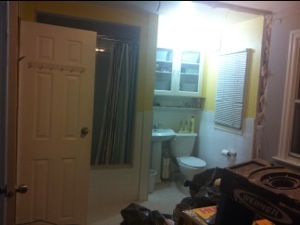
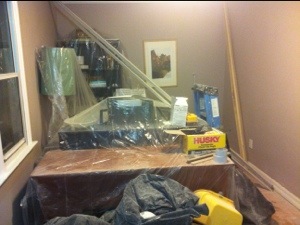
– Friday afternoon: demolition of old front porch enclosure

– Friday evening: start framing and replace front window on original exterior house wall

NOTE: Christian basically drills into his own thumb at this point; we probably should have gone to the hospital but he’s too darned stubborn so tough and manly that he forged ahead.

– Saturday all day: more framing, thanks to our friend Merv and neighbor Mike for the extra hands!

– Sunday all day: ply wood up and wrapping started, windows in!  Christian’s brother shows up just in time to help install the double front doors

– Monday: finishing up framing, wrapping and starting on the electrical (again, get a pro to do this!)


NOTE: wondering where I am during all this?  Oh, I remember, I was chiseling out all the old ceramic tiles and mortar that once was the floor of the enclosure.  Worst. Job. Ever.  Seriously, right up there with taring (water-proofing) our basement walls…more on that another time.

Yep, this was me.  All weekend long.  chip chip chip ow. chip chip chip ow. ow. ow. chip bang. bang bang chip chip.


What I learned later was that there is a power tool that does this job.  In just hours (honestly I’m guessing I spent a good 20+ hours on this).  One of our contractor friends said we “could have borrowed it”.  Or, we could have even gone the Home Depot Tool Rental route. I can’t help but wonder if Christian was with-holding this information in order to keep me completely occupied for the weekend and out of his hair. I’m still laughing about this one.  ha. ha. ha.


With weekend #1 behind us, we were already feeling behind.  The siding wasn’t in yet (it was on special order).  I was still chipping away at the tiles.  We had clearly forgotten what it felt like to work 10+ hour days on weekends.  The little projects were adding up to one massive to-do list.


Weekend #2: May 28-29th

Getting the siding up on the exterior (woo! the vision is coming alive!)

Insulation (another one of my not-so-favourite jobs),dry-walling and more dry-walling.

Let’s not even talk about the experience we had installing the ceiling dry-wall.  Honestly, either get poles for extra support or hire a professional….that was not one of our finer renovating moments.

Weekend #3: June 4-5th


Finish drywall, followed by extreme muding and taping


Weekend #4: June 11-12th

We. Are. Over. This. Renovation.

How much time can a 200 square foot space to renovation? Too long.  The little jobs just kept coming, and poor Christian was taking extra days off of work to help push our *little* project along.

Accomplishments:

– building the cedar landing and stairs at the front

– sanding the drywall

– priming and painting the walls


Weekend #5: June 18-19th

Ironically, June 18th marked the first year of marriage for us.  We should take a break, right?  Wrong.  It was pretty fitting for us that we should spend our anniversary working on our house.  Instead we:

– installed lights, finished electrical

– cleaned tiles and grout

– put baseboards in, windows trimmed

*We did indulge in a much-deserved dinner at the 360 restaurant that night…a 9pm reservation.  We were literally falling asleep at the table after a full day of work.  Ah, marital bliss….allow me to take a minute to share one of our favouriate wedding pics that I know you will all love and appreciate:

Photo Credit: Claudia Hung Weddings

*sigh* the good ol’ days.


Back to renovation-reality: The most rewarding moment of the entire process?  Arriving home after our dinner in the sky at the CN Tower and seeing our newly installed lights, shining like a beacon in the night!  Although it was a lot of work and not our first choice on how to spend our anniversary, we felt a sense of pride when we arrived homed, walked up our newly-built, cedar-smelling stairs and used our new front door for the first time!  Kind of a touching moment, isn’t it?  All together now: “awwwwwwww”:

Thanks for reading – share your comments below!


Looking Back: Our first night in Leslieville (let the demolition begin)

Ah, memories.

I still vividly remember the evening my husband and I took possession of our first home.  It was a Friday night in late September, 2009.  A BEAUTIFUL night.   We scurried around town all afternoon finalizing the close, heading to the lawyers office to pick up the keys, until we finally found ourselves excitedly driving up our street at about 6pm for the first time as new home-owners.  And we weren’t just home owners.  We were home-owners in Leslieville. We were in love.


Of course, shortly after walking through our new home for perhaps the 4th time since we had first seen it, we immediately realized that

a) we were absolutely famished, and

b) that we signed ourselves up for a lot of work.  Like, a tonne of work. I’m talking never-ending renovations here.


Well, it’s all about tackling one problem at a time, so we decided to venture down Queen St to savour our first local meal as Leslieviller’s.  Reliable Fish and Chips was smelling mighty good, so we brought our grub home in styrofoam containers, popped the champagne, and sat on our kitchen floor to enjoy our first meal.  (No furniture yet….remember, we are starting renovations….this is the sole purpose for my blog…I’m just building context here….work with me…)

Yes, I brought glass champagne glasses specifically for this event (and yes, it goes well with styrofoam, fish and chips!)

Yes, those are our gorgeous blush-pink counter tops with coordinating blush-pink and white ceramic tiles in the background.

Yes, this kitchen is about to be destroyed.


But before we get there, let’s move back outside, where our perfect little street heard the first smashes of the sledge hammer emanating from our house: “BAMMM!!”  “SMACKKK” BASH!!

Time: 7:48 pm

We’ve had possession for almost two hours.  Let the games begin.


And so begins our story: two new homeowners + one quiet street in Leslieville + one very old house + Melissa’s obsession with all things decor, design and reno = GREAT idea for a regular blog on the Leslieviller!


Enjoy.

Comment.

Relate.

Share.


More to come,

Melissa