Dream Bathroom: Revealed!

It feels like we’ve been sidetracked with all of this flooring drama.  Actually, no, not “feels like”…we really have! We’ve had the bathroom about 85% done for several weeks, but all this flooring nonsense stopped us in our tracks.

This past weekend, we managed to get a lot accomplished. There’s nothing like the impending arrival of my parents from Vancouver to cross things off the to-do list. Oh yes, we have been busy bees. We can proudly say that our bathroom is now 95% done. A few finishing touches, along with the much-anticipated arrival of our bathroom art (really? 2 weeks at customs? For art posters!!??), and we’ll be able to bump that number up to 100% finito.

But I can’t wait. Must. Share. Progress. Photos.

First of all, remember this picture?

20130208-085024.jpg

This has got to be one of my favourite renovation-related photos of all time. Anyhoo, back in this post of yore, I shared all the challenges that we had with our tiny, oh-so-narrow bathroom: we couldn’t physically be in there at the same time, the sink literally overlapped with the toilet, the shower head hit Christian in the chest (I think I forgot to mention that one), etc etc. It really boiled down to a non-functional layout for us.

So we changed it. A lot.

Before – view as you walked into the bathroom (sorry it’s so stretched…my SnapFish album went a little crazy):

Screen Shot 2013-04-16 at 9.56.11 PM
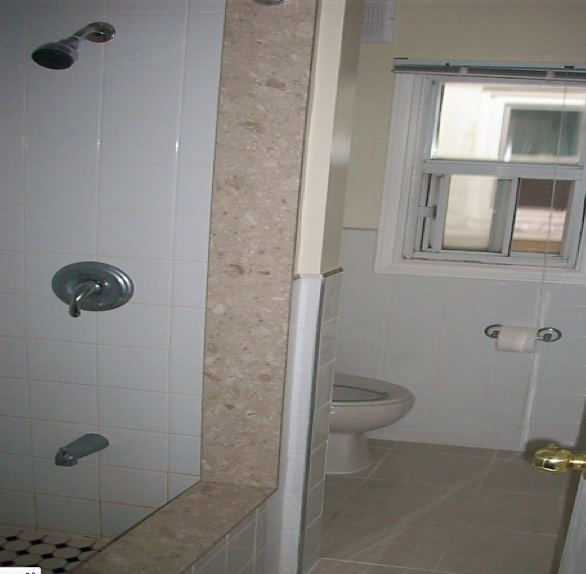
This photo does not do the narrowness justice: the entrance was just 24″….Christian and I had to do the Tango every time we passed by each other in here. So, onto the money shot:

20130416-215943.jpg
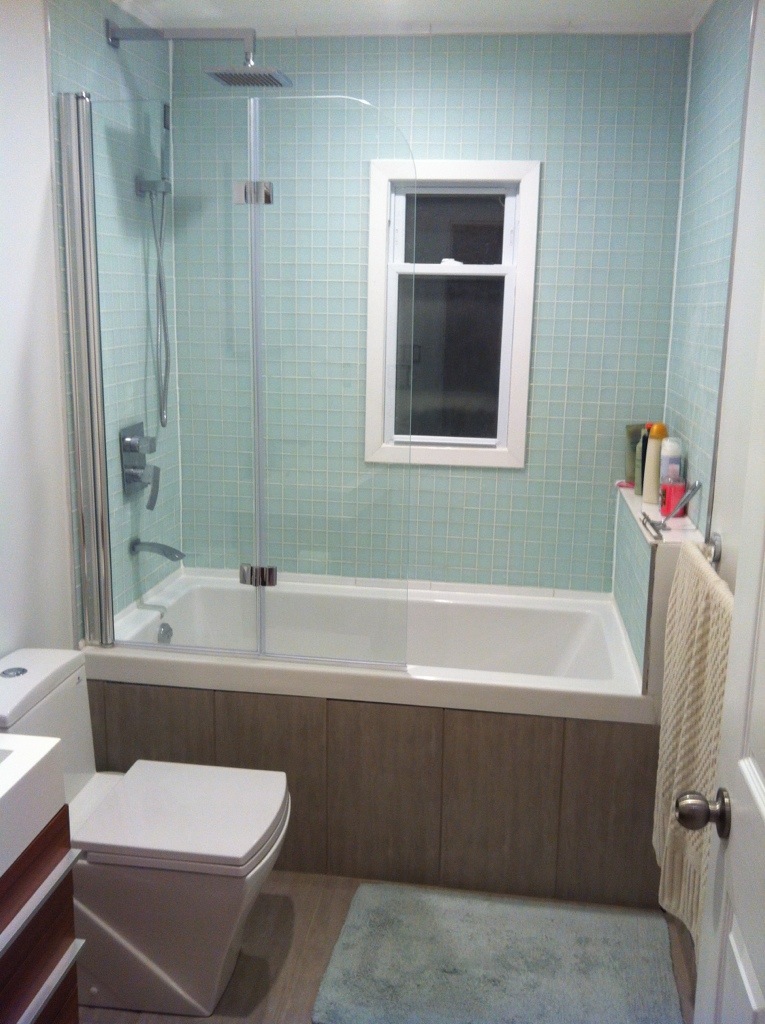
Yes, our bathroom is now a VERY happy place.

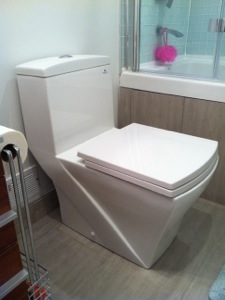
Let’s zoom in on a few fabulous things!  First, the toilet.  Yep, I’m leading with the crapper.  Honestly, I never thought I’d be someone who got excited about a toilet but this thing is seriously gorgeous.  And comfortable!  I was kind of against the square at first but I’m so glad that Christian got me on-side.  It’s a conversation piece.  Yep, my toilet is a real conversation starter….what can I say?

20130416-220059.jpg

The floor tile is from the store that never ceases to make me chuckle at the simplicity of the store name,  The Tile Store.   Soapbox moment warning!  If there is one thing you take away from this post, let it be this: do not go to big box stores for your tiles without shopping around.  The tile options that are available in this world will blow your mind!  We have been so surprised at all the options that are out there, many at very reasonable prices.  Yes, you can get lovely tiles at Big Box stores, but if you have a specific “vision”, shop around. Go to the mom & pop shops that only sell tile…you’ll be glad you did.  Don’t compromise your vision just because Home Depot doesn’t sell it.

Moving on…..we opted for a teak-look vanity.  Originally, I was really feeling the ash-grey look vanity (which this very same one comes in, by the way) but again, points for Christian for convincing me of the “warmth” of teak (I love that my husband actually cares about these decisions):

20130416-220126.jpg

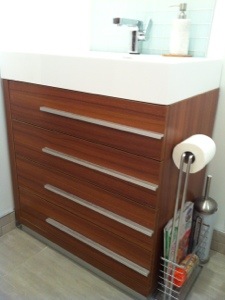
We picked up both the toilet and the vanity at Toronto Vanity, where Miguel was super helpful and responsive.  If you’re into a bit more of a contemporary/ modern look, this is the place to be.  Most vanities come with the sink top, faucet (see photo below for a close up of the faucet), AND medicine cabinet for around $1,000.  Even IKEA vanities have a hard time beating that price…trust us…we did our research.  What’s great is that there are about 8 different faucets you can choose from, all for the same all-in price.  Customization without all the “I love this faucet more but it’s twice the price” drama.  Cuz  you know I’m always the one who wants the more expensive one.  Always.

Now for a zoom-in on the backsplash, which matches the tile in the shower surround.  It’s a beautiful ice-blue frosted square glass tile. Again, we shopped around and had a hard time finding anything like this for under $8.00/ sq foot….on a whim, we hit up Ceramic Tile World in the east end of Toronto, and there she was…on sale for $5.00/ sq foot.  It was destiny!  And I’m in love with my marble soap pump with a hint of sparkle that I picked up at the Bay…it’s so glam-squad.

20130416-220140.jpg

Finally, the shower head.  Christian loves the square look so I let him run with this one.  We went to Bath City in the Beach and they were amazing.  Honestly, if you want to learn everything you ever wanted to know about plumbing on a Saturday afternoon, go here.  Their hours are awesome and the staff are super knowledgeable. We picked up the shower system and glass shower door from them.  A+

20130416-220150.jpg

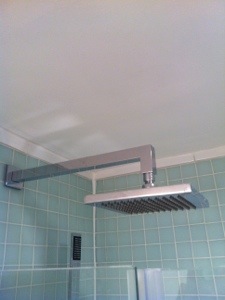
The best part is?  The shower head doesn’t even come close to hitting Christian in the chest…or head!  It’s so tall!  Yay!  It’s a beautiful chrome finish rainfall shower and again, I’m in love.  And yes, I *might* sometimes sing into the wand that you see in the photo, as it totally resembles some kind of futuristic microphone.  Whatever.

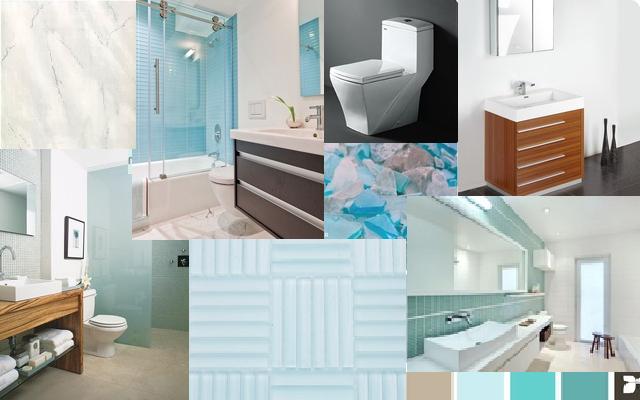
What’s cool is that we really stuck to our “vision” board and things really came together!  What the heck did people do before Pinterest?

Bathroom inspiration

So, there you have it!  Our 95% complete bathroom!  More to come on artwork, towel bars and other riveting finishing touches.  But we’ll save that for later…too much excitement already for just one post!

xo M

Good rule of thumb: Pipes + Concrete Don’t Mix

Sorry I’ve been a bit MIA for several days – there’s a good story behind it, I promise!  It seems that we’re having a little bit of…er….water drama. Christian and I have managed to avoid major house melt-down for some time since our initial massive overhaul way back in the fall /winter of 2009 (we don’t miss those repeat moments of leaking ceilings in multiple rooms, flooding basements and so on).

Well, our lucky streak is over and we have learned a good lesson: concrete + pipes = BAD.

To keep it short and sweet for now: do not, I repeat, DO NOT rinse anything that has mortar or concrete in your laundry sink.  Even if you think “hey, this is just a little bit at the bottom of the pail…no bigge”.  It’s a biggie.  Don’t do it!!!!

More to come on this, (with some photos, of course), but let’s just say there is some serious upheaval happening in the basement and we are not happy campers.

Water has continued to be our #1 enemy when it comes to our happy little home. All will be fine in a few days, we’re certain, and I’ll be sure to fill you in on all the dramatic details soon!

Stay dry!


Inspiration all around us!

Sometimes, it’s hard to get started on a project.  You just aren’t sure what colour to work into a room, and walking into decor stores or even big-box stores can be extremely overwhelming, and cause you to spend 45 minutes considering the life and times of mailboxes (yes, I’ve done this…more on that another time).

So, where do we find inspiration for a room, design, or project?  Well, everywhere. Start taking notes of things that make you go “Hey, I really like that!”  If you see something you love, nab a picture on your phone and make a place to file your ideas and inspirations…it doesn’t matter if it doesn’t match anything right now, or perfectly fit into the guest bedroom you’re dying to dress up…just keep it….you never know when that idea or inspiration will come in handy!  Here are a few quick examples:

I nabbed this fabric during a recent trip to Fabricland (during their down-town location closing-out sale…*sniff*) and was immediately drawn to the colours.  I’m pretty certain it is going to be the inspiration for our office make-over project. So pumped!

This next one is all things funky.  I was out for dinner last night with some girl-friends at Southern BBQ style restaurant, Harlem, on Queen West in Toronto.

Near our table was an array of funky prints, and this one caught my eye immediately.  Welcome to DIY-ville, population: YOU!  (or me).  It’s a really cool twist on a large picture frame, involving what seemed to be an old window, handle and all, with distress marks for good measure.  The classic print that is framed just met its match with this one!  This is the kind of thing you can create with awesome garage sale, antique or auction finds.

Finally, a little vay-cay inspiration.  Christian and I recently went on a little road-trip to Essex County, Ontario.  En route, we stopped at the WindJammer Inn, in Port Stanley, ON, an adorable B&B with out-of-this-world food.  Our room was cozy, and had a great rustic-cottage-meets-contemporary vibe to it.  Right away I was drawn to the curtain head-board.  I apologize that I don’t have an amazing picture of it, but here’s this one from their own website (they have since changed the cover to crisp white and light blue strip rather than this busy guy, which looks really awesome):And here’s one of me shortly after launching myself onto the giant king-sized bed (we have a Queen at home, and it never ceases to amaze me just how big King beds are).  So for the quality…our camera was really acting up.  But you get the idea, plus, who doesn’t love dorky pictures like this one on a Friday?:

Finally, here is a waaaaay better version to help with your headboard inspiration from (where else) Apartment Therapy:

Love the yellow-teal-chocolate brown combo!

So, there you have it – go out this weekend and get INSPIRED!

To enclose, or not to enclose: PART 2, the Grand Finale!

For those of you who had the chance to read my recent blog on our flip-flopping decision relating to our porch enclosure, you will be pleased to know that it’s time for the grand reveal.  There are, of course, several tweaks, finishing touches and final projects to be completed (it’s the renovation that keeps on giving, remember?), but you will get the overall gist of our latest renovation experience momentarily.


Before I get to the grand reveal, let’s review the stages of progress, shall we?  As I’ve already shared with you, Christian and I would consider ourselves to be renovation vets, having already tackled a complete basement overhaul, re-wiring of our old knob-and-tube electrical (NOTE: we didn’t do the wiring, but cleaned up the massive mess afterward by patching and painting all the walls!), giving our kitchen a serious facelift, removing walls on the main floor, installing flooring and refinishing our stairs (oh, the blog stories to come!).  Now, Christian and I decided to work on the porch enclosure and front-of-house over our main upstairs bathroom for two key reasons:

1) it would be faster, and,

2) it would be cheaper.


Turns out, we were pretty much wrong on both fronts.


Weekend #1: May Long Weekend

– Friday afternoon: demolition of old front porch enclosure

– Friday evening: start framing and replace front window on original exterior house wall

NOTE: Christian basically drills into his own thumb at this point; we probably should have gone to the hospital but he’s too darned stubborn so tough and manly that he forged ahead.

– Saturday all day: more framing, thanks to our friend Merv and neighbor Mike for the extra hands!

– Sunday all day: ply wood up and wrapping started, windows in!  Christian’s brother shows up just in time to help install the double front doors

– Monday: finishing up framing, wrapping and starting on the electrical (again, get a pro to do this!)


NOTE: wondering where I am during all this?  Oh, I remember, I was chiseling out all the old ceramic tiles and mortar that once was the floor of the enclosure.  Worst. Job. Ever.  Seriously, right up there with taring (water-proofing) our basement walls…more on that another time.

Yep, this was me.  All weekend long.  chip chip chip ow. chip chip chip ow. ow. ow. chip bang. bang bang chip chip.


What I learned later was that there is a power tool that does this job.  In just hours (honestly I’m guessing I spent a good 20+ hours on this).  One of our contractor friends said we “could have borrowed it”.  Or, we could have even gone the Home Depot Tool Rental route. I can’t help but wonder if Christian was with-holding this information in order to keep me completely occupied for the weekend and out of his hair. I’m still laughing about this one.  ha. ha. ha.


With weekend #1 behind us, we were already feeling behind.  The siding wasn’t in yet (it was on special order).  I was still chipping away at the tiles.  We had clearly forgotten what it felt like to work 10+ hour days on weekends.  The little projects were adding up to one massive to-do list.


Weekend #2: May 28-29th

Getting the siding up on the exterior (woo! the vision is coming alive!)

Insulation (another one of my not-so-favourite jobs),dry-walling and more dry-walling.

Let’s not even talk about the experience we had installing the ceiling dry-wall.  Honestly, either get poles for extra support or hire a professional….that was not one of our finer renovating moments.

Weekend #3: June 4-5th


Finish drywall, followed by extreme muding and taping


Weekend #4: June 11-12th

We. Are. Over. This. Renovation.

How much time can a 200 square foot space to renovation? Too long.  The little jobs just kept coming, and poor Christian was taking extra days off of work to help push our *little* project along.

Accomplishments:

– building the cedar landing and stairs at the front

– sanding the drywall

– priming and painting the walls


Weekend #5: June 18-19th

Ironically, June 18th marked the first year of marriage for us.  We should take a break, right?  Wrong.  It was pretty fitting for us that we should spend our anniversary working on our house.  Instead we:

– installed lights, finished electrical

– cleaned tiles and grout

– put baseboards in, windows trimmed

*We did indulge in a much-deserved dinner at the 360 restaurant that night…a 9pm reservation.  We were literally falling asleep at the table after a full day of work.  Ah, marital bliss….allow me to take a minute to share one of our favouriate wedding pics that I know you will all love and appreciate:

Photo Credit: Claudia Hung Weddings

*sigh* the good ol’ days.


Back to renovation-reality: The most rewarding moment of the entire process?  Arriving home after our dinner in the sky at the CN Tower and seeing our newly installed lights, shining like a beacon in the night!  Although it was a lot of work and not our first choice on how to spend our anniversary, we felt a sense of pride when we arrived homed, walked up our newly-built, cedar-smelling stairs and used our new front door for the first time!  Kind of a touching moment, isn’t it?  All together now: “awwwwwwww”:

Thanks for reading – share your comments below!